
Overview
One of the most common marketing goals in the restaurant industry is tracking campaign performance – getting the right audience to the website and having them reserve a table.
In this guide, we will go through the process of tracking the reservation bookings on our test website https://r329n7.csb.app/. The outcome we're looking for is to have GTM fire a trigger when a guest makes the reservation. From there, it's easy to instrument other tags.
Verify your Google Tag Manager installation
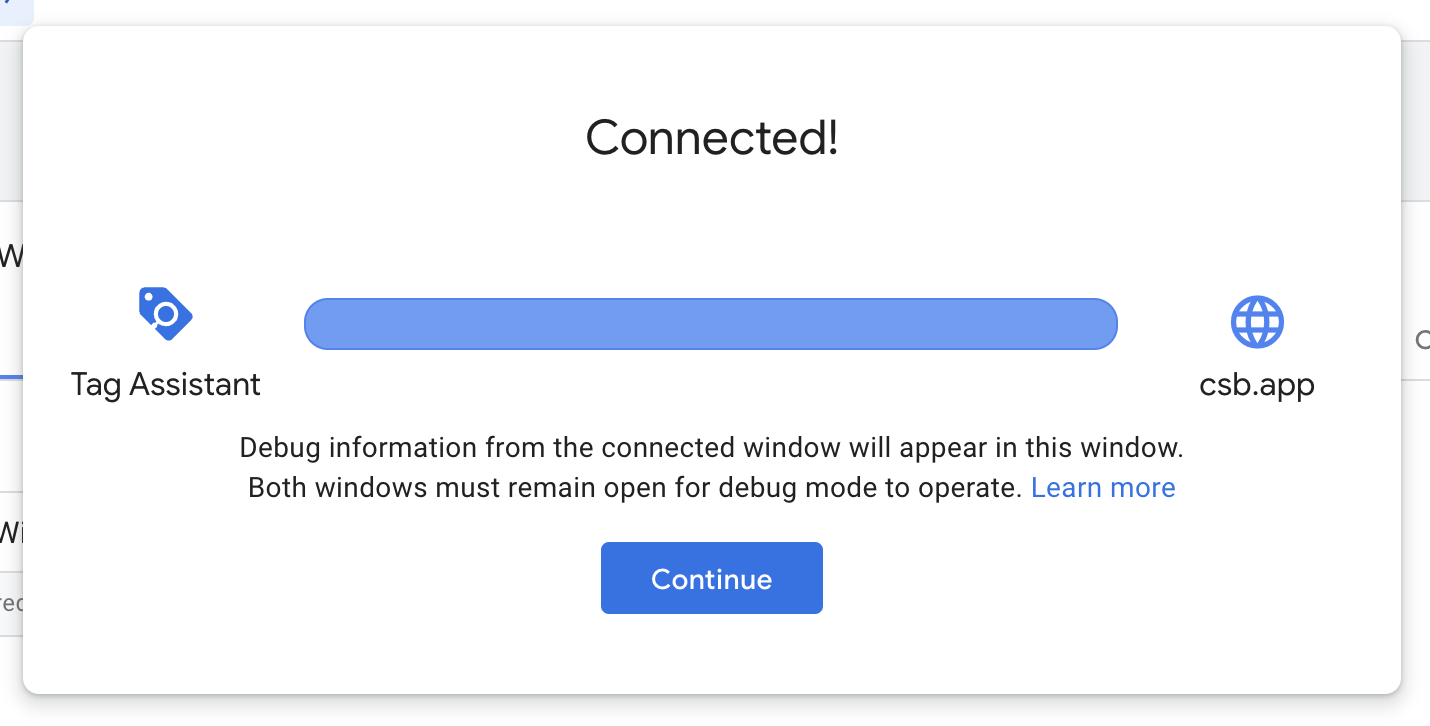
Before we start, make sure that the Google Tag Manager container is integrated and verified on your website. You can do this if you go to your GTM container, click "Preview" and see a message saying "Connected".
Aleno widget events API
The widget will emit events at different moments in the user journey. For the full list, and a detailed specification, see our article on Widget events API.
Custom HTML tag
To make GTM aware of the widget events, we'll create a custom HTML tag and then fire a custom GTM tag from within. We are essentially passing data from the widget to Google Tag Manager.
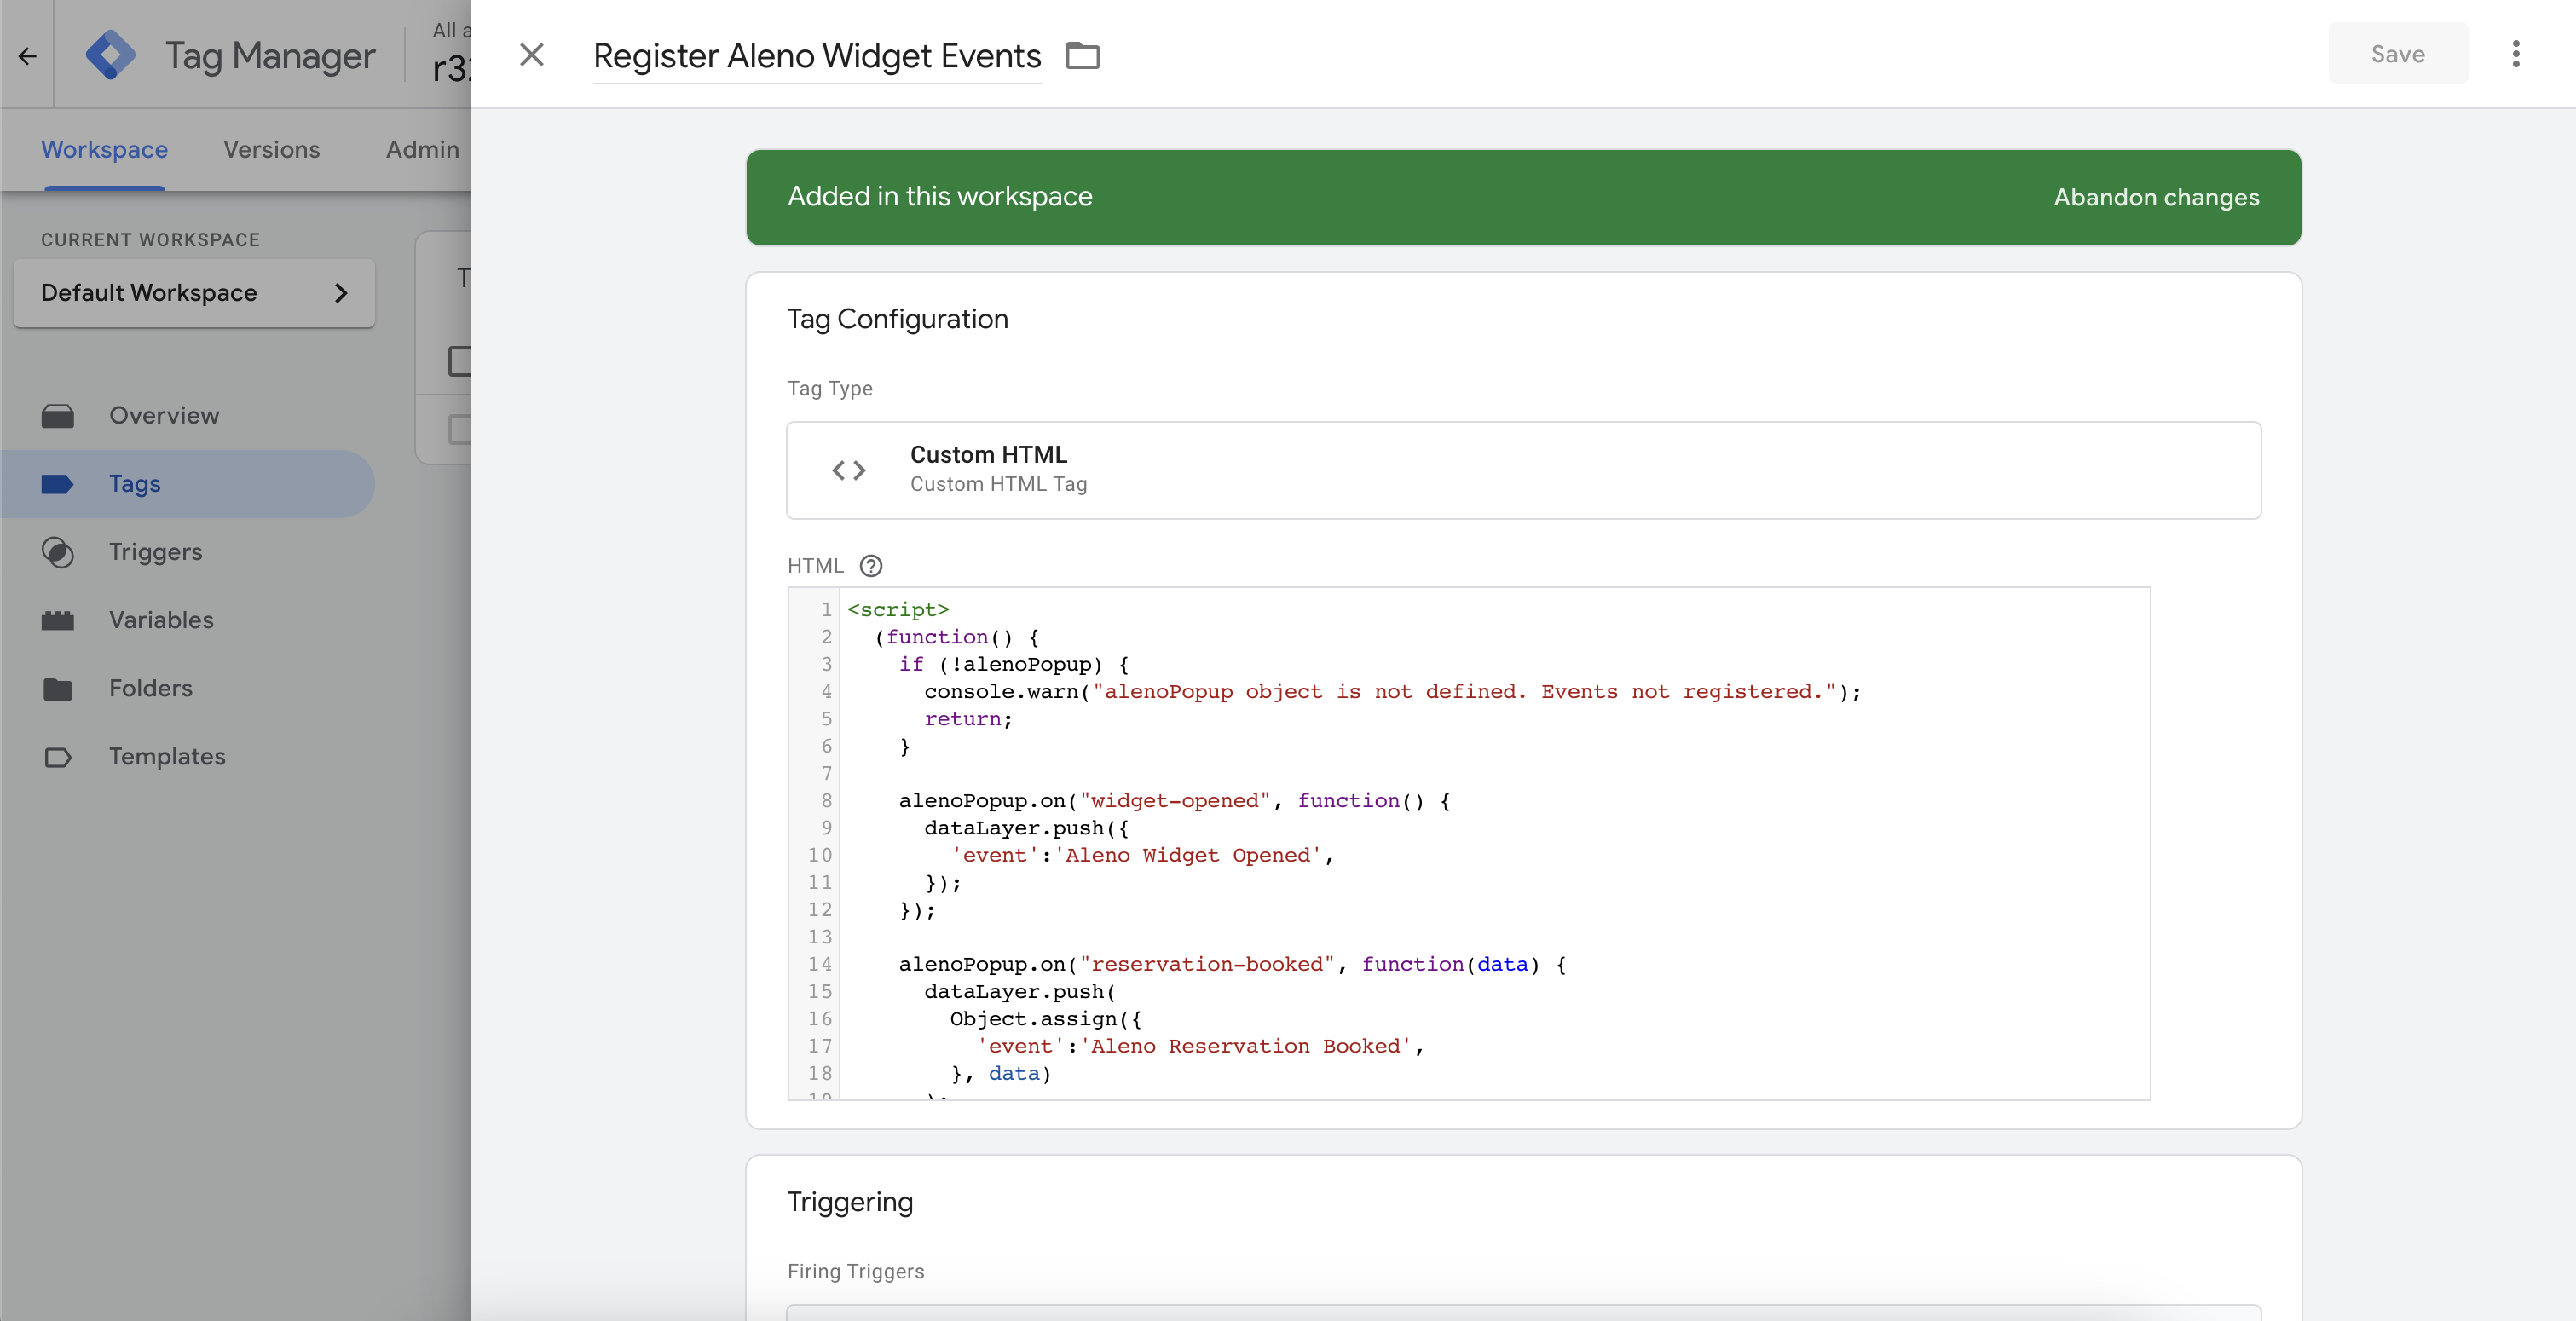
Go to Tags → New. For the Configuration, choose "Custom HTML".
Then paste this into the HTML section:
<script>
  (function() {
    if (!alenoPopup) {
      console.warn("alenoPopup object is not defined. Events not registered.");
      return;
    }

    alenoPopup.on("widget-opened", function() {
      dataLayer.push({
        'event':'Aleno_Widget_Opened',
      });
    });

    alenoPopup.on("reservation-booked", function(data) {
      dataLayer.push(
        Object.assign({
          'event':'Aleno_Reservation_Booked',
        }, data)
      );
    });

    alenoPopup.on("widget-closed", function() {
      dataLayer.push({
        'event':'Aleno_Widget_Closed',
      });
    });
  })();
</script>
You should end up with something like this:
Let's break it down a bit:
First we wrap everything in a self-invoking function. This is just so we can stop execution if for some reason alenoPopup object isn't instantiated. This could happen if the widget Javascript code wasn't added to the website properly. While this is optional, it's a good practice to catch such misconfigurations.
Next, we register our event listeners, and fire a custom GTM event for each. We can then create new Triggers in GTM to listen to these.
Let's take a look at the Reservation Booked:
alenoPopup.on("reservation-booked", function (data) {
  dataLayer.push(Object.assign({ event: "Aleno Reservation Booked" }, data));
});
The reservation-booked event handler is passed an argument that contains reservation details, such as PAX, date, guest name, email and more.
In our example, we just merge the reservation details with an object that defines the event name, using Object.assign(). If you don't need any of the reservation details, you can just push a simple event, like so:
dataLayer.push({ event: "Aleno Reservation Booked" });
The event name is also completely up to you. In our example, we used "Aleno Reservation Booked". Just make sure to use the same name later in GTM.
|
About spaces in event names Please note that Google Analytics 4 recommends that you don't use spaces in event names. In our testing however, GA4 allows events with names just fine and shows them accurately in Reports and Explore. If you want to align with the recommendation, change the names accordingly. |
Triggering the tag
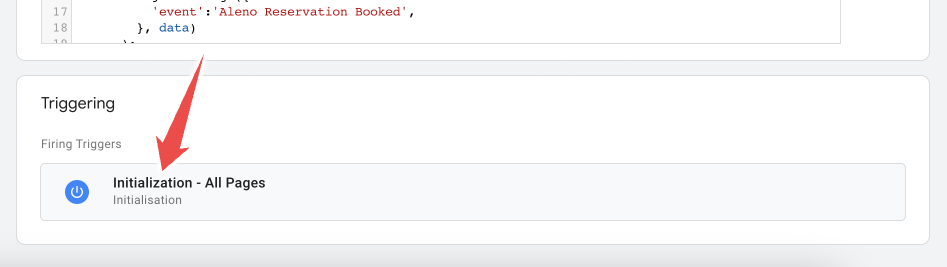
While still on the same page, choose "Initialization – All Pages" for the tag trigger. This means it will only show once when the GTM container is initialised. Do not use "Page View" because that could register multiple event listeners and lead to multiple events for a single guest interaction, depending on your app or website.
Verify the events
Now every time a guest opens the widget, books a table or closes the widget, we will emit different Google Tag Manager events.
Before we continue, let's verify our setup using GTM Preview mode.

If you open the widget, book a table and close the widget, you should see the events triggered in the Tag Assistant. You can also see that our "Aleno Reservation Booked" event comes with all the extra data, making it available to GTM:
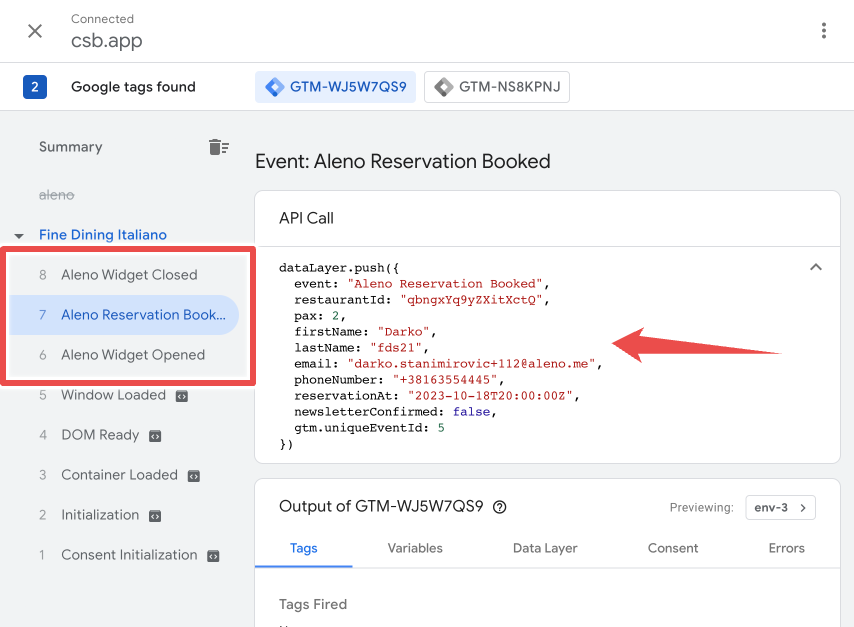
For a complete list of available event properties, see our Widget events API document.
Next steps
Perfect, our events are successfully firing via GTM! 🎉
You can now create Triggers in GTM based on those events. Use the "Custom Event" trigger:

Make sure to use the same event name as you defined it previously. In our case, that is "Aleno Reservation Booked", but it could be anything.
Note on event properties
If you want to track reservation properties in your tags – for example, to fire a GA4 event tag that has properties like pax or such – you need to set up data layer variables in GTM. This is outside of the scope of this guide, but here's a handy guide that explains it.
Multiple Locations: Tracking Reservations per Restaurant
If you want to track reservations for more than one restaurant or outlet/location via Google Analytics 4 and Google Tag Manager, and if you would like to separately display reservation data per restaurant, the following steps need to be taken in Google Tag Manager and Google Analytics 4.
A) In Google Tag Manager
1. Add the Restaurant ID as a Data Layer Variable
To do this, create a Data Layer Variable, for example, named "DLV - restaurantId":

This makes the cryptic restaurant ID available as a variable for further use in GTM.
2. Create another variable for converting the Restaurant ID into a clear name
To do this, select the option "Lookup Table" or "Search Table" on the right when creating the variable. In the left column, enter the Restaurant ID and then the clear name of the restaurant on the right.

Give the variable a name, for example, "ID2Name" and save it.
3. Create a Custom Event Trigger for each restaurant
To do this, copy the Custom Event for "Aleno_Reservation_Booked" (see above). Important: Select the option "trigger for some events". Then choose the previously created variable "ID2Name" as the condition and enter the clear name of the restaurant (e.g., "Blauer Saal") previously stored in the table in the free field.

Finally, give the trigger a name, e.g., "Custom Event - Blauer Saal booked". Create such a trigger for each additional restaurant.
4. Create new tags for pushing the booking events to GA4
Copy the tag "GA4 Event - Aleno Reservation Booked" (which already exists in the GTM account according to the above instructions) and select the trigger for the respective restaurant. This transmits the Custom Event to Google Analytics 4, with the selected Event Name - e.g., "Blauer_Saal_booked" (Note: GA4 recommends creating Event Names without spaces but with underscores).
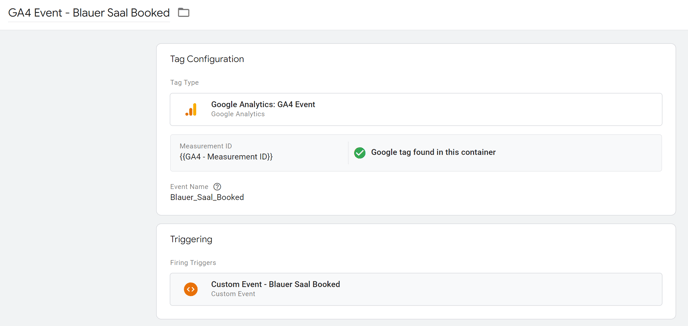
Name the tag - e.g., "GA4 Event - Blauer Saal Booked". Create such a tag with the corresponding trigger for each restaurant for which reservations are to be displayed separately.
B) In Google Analytics 4
Mark the events as conversions (they may only appear as Custom Events in the table the following day. If they don't appear, it's best to use the search function)."
Conclusion
Connecting widget events with GTM takes a few steps, but once it's set up, you have a reliable way to send key guest interaction data to all your data destinations.